Issue: Not able to configure email settings and/or not able to get a successful e-mail test on your Insteon IP Camera
Solution: Please see below for common SMTP Settings. (Note, while these settings work for most users, you may need to contact your email provider for you specific settings)
Aol:
smtp server: smtp.aol.com
smtp port: 587
Transport layer security: starttls
Apple/iCloud/Me:
smtp server: smtp.mail.me.com
smtp port: 587
Transport layer security: starttls
AT&T/SBC Global:
smtp server: smtp.att.yahoo.com
smtp port: 465
Transport layer security: tls
Comcast:
smtp server: smtp.comcast.net
smtp port: 465
Transport layer security: tls
Gmail:
smtp server: smtp.gmail.com
smtp port: 587
Transport layer security: starttls
Hotmail/MSN/Outlook/Live:
smtp server: smtp.live.com
smtp port: 587
Transport layer security: starttls
RoadRunner:
smtp server: smtp-server.<location>.rr.com
smtp port: 587
Transport layer security: starttls
Time Warner:
smtp server: mail.twc.com
smtp port: 587
Transport layer security: starttls
Verizon:
smtp server: smtp.verizon.net
smtp port: 587
Transport layer security: starttls
Yahool:
smtp server: smtp.mail.yahoo.com
smtp port: 465
Transport layer security: tls
Insteon Camera - invalid params
Symptoms
The Insteon Camera is generating the following error anytime you attempt to save any changes:
invalid params
Causes
The error is cause by invalid characters in the Username or Password of the camera
! @ # $ % ^ & * ( ) - +
Resolution
You will need to factory reset the camera and begin setup from the beginning. You are not able to change the username or password in the camera, as the existing login information is invalid.
Indoor Camera Factory Rest Steps:
Step 1: On the bottom of the camera locate the hole in the bottom of the camera marked RESET.
Step 2: Using a paperclip or similar object to press an hold the RESET button for 30 seconds.
Step 3: The camera will start to pan and tilt within 30 seconds of the reset.
Step 4 Wait 90 seconds before beginning again.
Outdoor Camera Factory Reset Steps:
Step 1: On the cable bundle, locate the reset button
Step 2: Press and hold the reset button for 30 seconds then let go.
Step 4: Wait 90 seconds before beginning again.
Insteon SD WiFi Camera Setup Videos
The links below will take you to specific video tutorials that will help you set up your new SD Insteon wireless IP camera.
Optional Camera steps:
The steps shown in these videos will work for either the Indoor Wireless IP Camera or the Outdoor Wireless IP Camera.
If you are not using your Insteon camera with the Insteon Hub, we recommend the following third party apps:
iOS - CamViewer, Foscam Pro, Live Cams Pro, OWLR
Android - IP CamViewer, TinyCam Monitor, NetEye Camera, OWLR
Windows Phone - IP Cam Controller
Insteon Wi-Fi Camera and Dynamic DNS Services
Connecting to your Insteon Wi-Fi Camera when you are away from home requires a reliable connection to your home's internet router. Use the information in this article to learn about configuring your camera for reliable away-from-home access.
Home Router IP Address
To connect to your camera when you are away from home, you need to know your home router's IP address. This information can be obtained by visiting this website. Use this internet-facing IP address when you are trying to access your camera from outside your home Wi-Fi network.
With most internet providers, your home IP address is subject to change.
Your IP address may change if there is a power outage
Your IP address may change if you reset or restart your router or modem
Your IP address may change if your internet provider renews your IP address lease
Consequently, relying on the numerical IP address for accessing your home can be problematic. While some IP addresses may stay the same for months, some may be renewed as frequently as every hour. Insteon Wi-Fi Cameras support several Dynamic DNS services that help mitigate this issue.
Dynamic DNS Services
A Dynamic DNS Service helps assuage the issue of changing IP addresses by reporting your camera's public IP address to a central, always-available service, ensuring that you always have the up-to-date IP address for your home. Insteon Wi-Fi Cameras support the following Dynamic DNS Services:
These services are all account-based and require that you configure information both with the 3rd party Dynamic DNS Service and the Insteon Wi-Fi Camera. To use a Dynamic DNS Service with your Insteon Wi-Fi Camera, you will need to perform the following steps:
Complete the manual port-forwarding steps necessary for remote access
Create an account with one of the 3rd party Dynamic DNS Services
Add a host to which your camera will forward its IP address information
Update your Insteon Wi-Fi Camera with your Dynamic DNS Service login information including User name, password and host
Adding your Dynamic DNS Service account to your Insteon Wi-Fi Camera can only be performed using the web interface. Select DDNS Service Settings from the left sidebar, choose your DDNS Service from the pull-down menu and enter your user name, password and host information.
After your configuration is complete, you will be able to access your camera from a web browser using your Dynamic DNS host name and your camera's port. For example:
http://dannycam.dyndns-server.com:25106
http://your-domain.your-ddns-service.com:your-camera-port
Configure Port Forwarding for Insteon Wi-Fi Cameras using a Buffalo Router
Follow the steps in this article to configure your Insteon Wi-Fi Camera for remote access. If the steps in this article do not match your specific router, consult your router's documentation.
Step 1
On your computer, open a browser and enter your router's IP address in the address bar. This address may be called Router IP Address or Default Gateway IP Address. If you do not know this information, follow the steps in this article to identify your router's IP address.
Step 2
You may see a log-in screen. Enter your router's user name and password. If you have never changed the password, try using the following:
User name: "root"
Password: Blank
Click OK to log in.
Step 3
Click the Add button located on the right side of the page.
Step 4
In the page that appears, enter the following information. The Local IP Address is the IP address of your Insteon Wi-Fi Camera.
TCP: 25106 (This should match the port given to your camera during camera setup)
UDP: 25106 (This should match the port given to your camera during setup)
LAN IP Address: Enter your Camera's IP Address
When ready, press Apply at the bottom of the page to save your changes.
Step 4
Test your connection by turning off Wi-Fi on your smartphone or tablet and attempt to control your WI-Fi Camera. If you can control your camera when on a cellular connection, then everything has been successfully configured.
Configure Port Forwarding for Insteon Wi-Fi Cameras using an Asus Router
Follow the steps in this article to configure your Insteon Wi-Fi Camera for remote access. If the steps in this article do not match your specific router, consult your router's documentation.
Step 1
On your computer, open a browser and enter your router's IP address in the address bar. This address may be called Router IP Address or Default Gateway IP Address. If you do not know this information, follow the steps in this article to identify your router's IP address.
Step 2
You may see a log-in screen. Enter your router's user name and password. If you have never changed the password, try using the following:
- User name: "admin"
- Password: "admin"
Click OK to log in.
Step 3
On the left sidebar, click NAT Setting.
Step 4
Click Virtual Server which has appeared beneath NAT Setting.
Step 5
In the page that appears, enter the following information. The Local IP Address is the IP address of your Insteon Wi-Fi Camera.
- Enable Virtual Server: Yes
- Well-Known Applications: User Defined
- Port Range: 25106 (This should match the port given to your camera during camera setup)
- Local IP: Enter your Camera's IP Address
- Local Port Range 25106 (This should match the port given to your camera during setup)
- Protocol: Both
- Description: Your Camera's Name
When ready, press Finish at the bottom of the page to save your changes.
Step 6
Test your connection by turning off Wi-Fi on your smartphone or tablet and attempt to control your WI-Fi Camera. If you can control your camera when on a cellular connection, then everything has been successfully configured.
Identifying Network Information for Insteon Wi-Fi Camera
Follow the steps in this article to identify your network's Router or Gateway IP address and your network's Subnet Mask. This information will be used when configuring your camera for remote access.
IP address steps for Mac OS X
Step 1
Open System Preferences from the Apple Menu
Step 2
Click Network
Step 3
Select the connected network interface from the left sidebar: Wi-Fi or Ethernet.
Step 4
Click Advanced
Step 5
Click TCP/IP
Step 6
Write down the Router IP address and Subnet Mask. Your Router IP Address will also be used as your DNS Server address.
IP address steps for Windows
Step 1
Open the Control Panel from the Start Menu
Step 2
In the search field, type Adapter
Step 3
Click View Network Connections
Step 4
Right-click the active network connection and select Status
Step 5
Click Details
Step 6
Write down the IPv4 Default Gateway and IPv4 Subnet Mask. Your Default Gateway IP Address will also be used as your DNS Server address.
Something Went Wrong While Configuring Your Camera

When configuring an Insteon Wi-Fi Camera, you may occasionally encounter a message informing you that something went wrong while configuring your camera and to ensure that the ethernet cable is connected. There are several reasons why this may occur.
Your Wi-Fi connection is offline
Your Wi-Fi Camera was unplugged from ethernet or power
Basic Troubleshooting
Ensure that your Wi-Fi Camera is connected to a working power outlet and that the ethernet cable is firmly seated, even if you intend to use your camera with WI-Fi. It may be helpful to unplug and reinsert the ethernet cable.
Try restarting your Insteon Wi-Fi Camera by unplugging its power cord. Wait about 30 seconds and then reconnect your camera to power.
Ensure that your smartphone or tablet is connected to the same Wi-Fi Network as your Insteon Wi-Fi Camera.
Confirm that your internet router and cable or DSL modem are connected to power and turned on. Learn how to identify your router and cable or DSL modem.
Check that your Wi-Fi router is working by attempting to browse a website using another device or computer in your home.
Try restarting your router and cable or DSL modem.
Something Went Wrong While Configuring the Camera Password
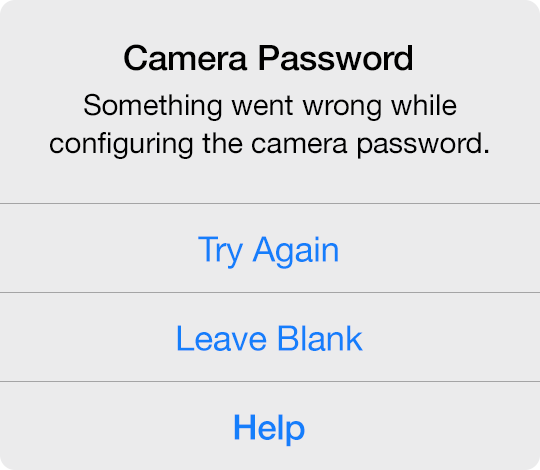
When configuring an Insteon Wi-Fi Camera, you may occasionally encounter a message informing you that something went wrong while configuring the camera password. There are several reasons why this may occur.
The password was shorter than 1 character or longer than 12 characters
The password included characters other than numbers and letters
The password included spaces
The Insteon app should properly restrict entry of passwords such that they do not contain any unsupported or invalid characters. If you are unable to resolve the password following the restrictions above, you can tap Leave Blank to proceed without a camera password. After setup is complete, you can change the password from Edit Camera.
Changing the Camera Password from Edit Camera
Step 1
From Edit Camera, scroll down to Network Settings and tap Password

Step 2
Replace the blank password with your desired camera password. Ensure your password meets the following criteria:
Between 1 and 12 characters long
Letters and numbers only
No spaces
Case sensitive

Step 3
Tap Done
The Insteon app will update your camera's password and attempt to reconnect.

Basic Troubleshooting
If, after changing your camera's password, the Insteon app is unable to connect to your camera, attempt setup of your camera again.
Navigate to Edit Camera, scroll to the bottom and tap Delete Camera
Add a Device and choose Camera
In the list of cameras, your camera should appear as already configured
Enter the user name and new password chosen in step 2 above. If you receive an error informing you that the user name or password is incorrect, try using a blank password as it's possible the camera password was not updated.
If you are still unable to connect to your camera, follow the steps in this article to factory reset your camera and start again.
Something Went Wrong While Configuring the Camera User Name
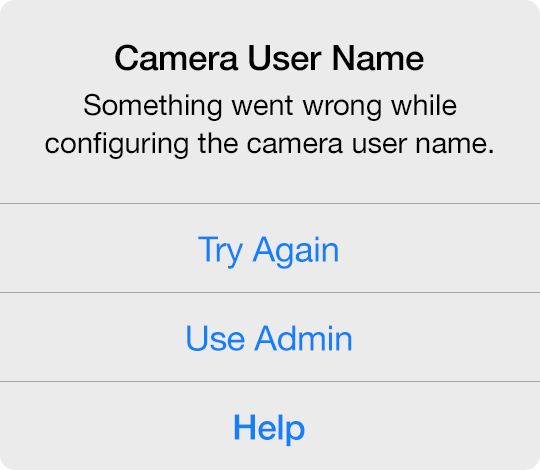
When configuring an Insteon Wi-Fi Camera, you may occasionally encounter a message informing you that something went wrong while configuring the camera user name. There are several reasons why this may occur.
- The user name was shorter than 1 character or longer than 12 characters
- The user name included characters other than numbers and letters
- The user name included spaces
The Insteon app should properly restrict entry of user names such that they do not contain any unsupported or invalid characters. If you are unable to resolve the user name adhering to the restrictions above, you can tap Use Admin to use the default camera user name "admin" and complete setup. After setup is complete, you can change the user name from Edit Camera.
Changing the Camera User Name from Edit Camera
Step 1
From Edit Camera, scroll down to Network Settings and tap Username.

Step 2
Replace admin with your desired camera user name. Ensure your user name meets the following criteria:
- Between 1 and 12 characters long
- Letters and numbers only
- No spaces
- Case sensitive

Step 3
Tap Done
The Insteon app will update your camera's user name and attempt to reconnect.

Basic Troubleshooting
If, after changing your camera's user name, the Insteon app is unable to connect to your camera, attempt setup of your camera again.
- Navigate to Edit Camera, scroll to the bottom and tap Delete Camera.
- Add a Device and choose Camera
- In the list of cameras, your camera should appear as already configured.
- Enter the new user name chosen in step 2 above. If you receive an error informing you that the user name or password is incorrect, try using the user name "admin" as it's possible the camera user name was not updated.
- If you are still unable to connect to your camera, follow the steps in this article to factory reset your camera and start again.
Unable to Update or Read your Camera's Wi-Fi or Network Settings


When configuring an Insteon Wi-Fi Camera, you may encounter an alert informing you that the Insteon app was unable to update or read you camera's Wi-Fi or network settings. There are several reasons why this may occur.
Your camera may have become unplugged from ethernet or power
Your iPhone, iPad or iPod touch has been disconnected from your home's Wi-Fi network
Your home's internet router is not functioning properly.
Basic Troubleshooting
Ensure that your Wi-Fi Camera is connected to a working power outlet and that the ethernet cable is firmly seated. It may be helpful to unplug and reinsert the ethernet cable.
Confirm that your internet router is connected to power and turned on. Learn how to Identify your router and cable or DSL modem.
Ensure that your smartphone or tablet is connected to Wi-Fi. For setup to complete, your smartphone or tablet must be connected to the same Wi-Fi network to which your Wi-Fi camera is physically connected.
Try restarting your router.
Use Ethernet
If the Insteon app is unable to update your camera's Wi-Fi settings, you can elect to use ethernet instead of Wi-Fi. You can then use manually configure Wi-Fi settings using the camera's web interface. Once your camera is connected to your network using Wi-Fi, re-add the camera as an already-configured camera.
Configure HD Wi-Fi Camera Network Settings
Your camera's network settings are automatically configured for you when you add an Insteon Wi-Fi Camera. If you would prefer to configure your camera prior to adding it to the Insteon app, use your camera's web browser interface.
You can configure the following settings from the Insteon app:
IP Address
HTTP Port
You can configure the following settings from the camera's web browser interface:
DHCP
IP Address
Subnet Mask
Gateway IP Address
Primary DNS Server
Secondary DNS Server
HTTP Port
HTTPS Port
ONVIF Port
If you have already added your camera to the Insteon app, you should remove it before you make your changes. After you have completed your changes, re-add the camera as an already-configured Wi-Fi camera.
Step 1
Using Camera Tool, locate your camera on your network. Double click your camera in the list to open its web browser interface.
Step 2
Enter your camera's user name and password and click Login when ready.
Step 3
Click Settings
Step 4
From the left sidebar, click Network and then IP Configuration.
Step 5
Configure your network settings as desired. When ready, click Save.
Step 6
From the left sidebar, click Port.
Step 7
Configure your port settings as desired. When ready, click Save.
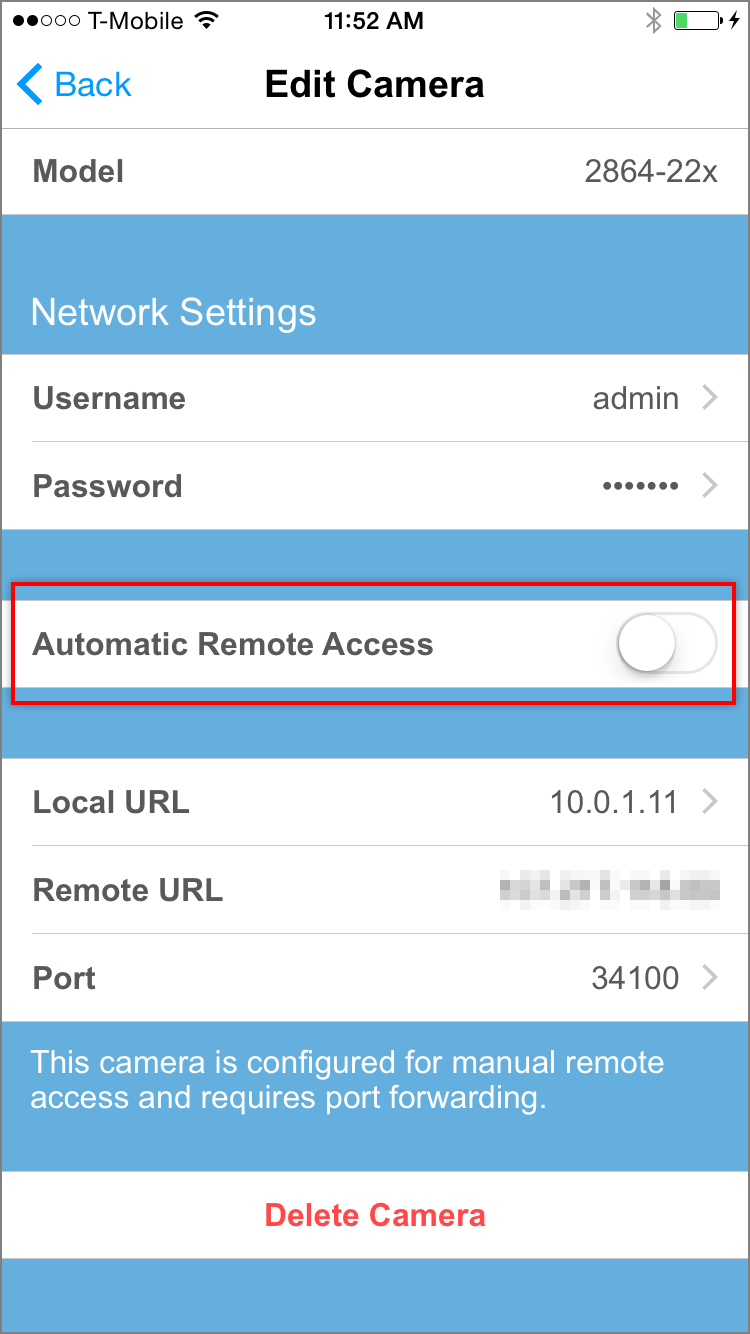
Configure Manual Remote Access for Insteon Wi-Fi Cameras
When configuring Insteon Wi-Fi Cameras, you may be presented with a message stating that you need to configure port forwarding on your router to see your camera when you are away from home. There are several reasons why this may occur.
Standard-definition Insteon Wi-Fi Cameras require port forwarding for remote access. Learn how to configure port forwarding for remote access.
Some Insteon HD Outdoor Wi-Fi Cameras require port forwarding for remote access
You've added an Insteon HD Wi-Fi Camera that was previously configured
Your Insteon HD Wi-Fi Camera supports Automatic Remote Access but network conditions have prevented the feature from functioning as expected. Learn more about troubleshooting Automatic Remote Access.
Previously Configured Insteon HD Wi-Fi Cameras
When adding an Insteon HD Wi-Fi Camera that has already been configured with a user name and password, the Insteon app does not alter any camera settings or attempt to configure Automatic Remote Access. Follow the steps in this article If you would like to enable Automatic Remote Access.
Configure Manual Remote Access with Port Forwarding
About Port Forwarding
Port forwarding is a process involving your home's router that allows you to access devices within your home when you are not using your home's Wi-Fi network.
Your home router creates a barrier that prevents your smartphone from talking directly to your Insteon Wi-Fi cameras. Port forwarding opens a door in your router's firewall for a specific function, in this case, access to your Wi-Fi cameras. This procedure needs to be performed for each Wi-Fi camera that you intend to access from outside your home's Wi-Fi network.
Port Forwarding Instructions
Insteon Support has compiled instructions that should help you configure routers that you are likely to have in your home.
Because every router is different and manufacturers are constantly making changes, the steps outlined in these articles may not perfectly match the steps required for your particular router. If you don't see your router brand listed or if you feel uncomfortable with the instructions, contact Insteon Support for further assistance.
For step-by-step instructions, choose your router brand:
Dynamic DNS Services
In addition to configuring your camera and router for port forwarding, you will need to configure a Dynamic DNS Service to ensure reliable access to your camera when you are away from home. Learn more about Dynamic DNS Services and Insteon Wi-Fi Cameras by reading this article.
Unable to Configure Automatic Remote Access
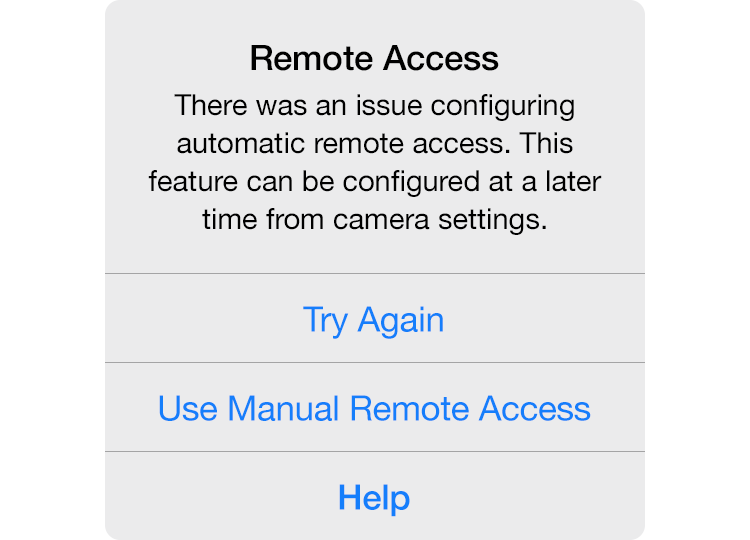
When configuring an Insteon HD Wi-Fi Camera, you may encounter an alert stating that there was an issue configuring automatic remote access. There are several reasons why this may occur.
Your home's internet connection is offline
Your home's internet router or modem is not functioning properly
Your home has more than one router resulting in a Double- or Triple-NAT
Your home's router is incompatible with the Automatic Remote Access feature
In corporate or school environments, your organizations firewall and security settings may prevent Automatic Remote Access
Your Insteon HD Wi-Fi Camera may require a firmware update. Learn more about updating your Wi-Fi Camera's firmware.
- Automatic Remote Access is not available on standard-definition Insteon Wi-Fi Cameras, standard-definition Insteon Outdoor Wi-Fi Cameras or Insteon HD Outdoor Wi-Fi Cameras that do not have a UID number printed on the rear of the camera housing.
Basic Troubleshooting
Confirm that your internet router and cable or DSL modem are connected to power and turned on. Learn how to Identify your router and cable or DSL modem.
Check that your internet connection is working by attempting to browse to a website using another device or computer in your home.
Try restarting your router and cable or DSL modem.
If your home has more than one router, connect Insteon Wi-Fi Camera to the router connected directly to your cable or DSL modem. If your Internet Service Provider has issued you a combined modem and router, connect Insteon Wi-Fi Camera to this device and attempt setup again.
If you believe that your router is preventing Automatic Remote Access, you can try updating your router's firmware. Follow the instructions provided by your router manufacture.
If you are attempting to setup an Insteon Wi-Fi Camera in a corporate or school setting, your IT department may have blocked the ports necessary for Automatic Remote Access to function. Contact your system administrator if you believe this to be the case.
If you are unable to alter your networking environment to enable Automatic Remote Access, you can still configure manual remote access using port forwarding.
Configuring Automatic Remote Access After Initial Camera Setup
You can enable Automatic Remote Access after adding your Insteon Wi-Fi Camera from camera settings.
Instructions for iPhone, iPad or iPod touch
Instructions for Android
Step 1
Navigate to Settings

Step 2
Tap Devices

Step 3
Select your HD Wi-Fi Camera from the list of devices

Step 4
Scroll to the bottom of the camera settings and tap the switch to enable Automatic Remote Access.
Your camera will attempt to configure Automatic Remote Access. If your camera is unable to configure Automatic Remote Access, you will have to configure remote access manually using port forwarding on your router.
Step 1
Navigate to Settings by tapping the Settings button and then selecting Edit Settings

Step 2
Tap Devices

Step 3
Select your HD Wi-Fi Camera from the list of devices

Step 4
Scroll to the bottom of the camera settings and tap the switch to enable Automatic Remote Access.
Your camera will attempt to configure Automatic Remote Access. If your camera is unable to configure Automatic Remote Access, you will have to configure remote access manually using port forwarding on your router.
Ethernet Cable Still Connected When Configuring Wi-Fi

When configuring an Insteon Wi-Fi Camera to use Wi-Fi, you may encounter an alert informing you that the ethernet cable is still connected to your camera. Insteon Wi-Fi Cameras can use ethernet or Wi-Fi to connect to your network, but not both simultaneously.
Basic Troubleshooting
Step 1
Tap Try Again to dismiss the alert

Step 2
Disconnect your camera's ethernet cable and power cable

Step 3
Restart your camera by reconnecting your camera's power cable

Step 4
Tap Next to begin searching for your Insteon Wi-Fi Camera.
Your camera will restart. Insteon HD Cameras restart in about 30 seconds. Insteon SD Cameras can take up to 2 minutes to restart.

Connect to Wi-Fi When Adding an Insteon Wi-Fi Camera

When setting up an Insteon Wi-Fi Camera, you may encounter an alert informing you to connect to your home's Wi-Fi network and attempt setup again.
If you are attempting to add a camera that is not on your local Wi-Fi network using the Add a Remote Camera feature, you must be connected to a Wi-Fi network before proceeding.
Step 1
Tap the Home button on your iPhone, iPad or iPod touch and navigate to settings.
Step 2
Tap Wi-Fi

Step 3
Ensure Wi-Fi is on and tap your Wi-Fi network.
If you have more than one Wi-Fi router, it is important to join the Wi-Fi network created by the router into which your Insteon Wi-Fi camera is connected. Learn more about identifying your home's Wi-Fi router.

Step 4
Tap the Home button on your iPhone, iPad or iPod touch and return to the Insteon app to resume camera setup.

Insteon Wi-Fi Camera Not Found During Initial Setup

When initially setting up your Insteon Wi-Fi Camera, you may encounter a message informing you that the app was unable to locate any cameras on your network. There are several reasons why this may occur.
Your Insteon Wi-Fi Camera is not connected to power
Your Insteon Wi-Fi Camera is not connected to your router with an ethernet cable
Your home's internet router or modem is not functioning properly
If you see a list already-configured cameras, ensure that you are connected to the correct Wi-Fi network. The Insteon app will display any Insteon cameras found on the connected Wi-Fi network, even if those cameras are already configured.
Basic Troubleshooting
Ensure that your Insteon Wi-Fi Camera is connected to a working power outlet and that the ethernet cable is firmly seated. It may be helpful to unplug and reinsert the ethernet cable. If your the LEDs above the ethernet port on the rear of the camera are not illuminated, your Wi-Fi Camera is not connected to a functioning ethernet port on your router. Indoor Insteon Wi-Fi Cameras should initiate a motor test about 10 to 30 seconds after connecting to power.
Try restarting your Insteon Wi-Fi Camera by unplugging its power cord. Wait about 30 seconds and then reconnect your camera to power.
Ensure that your smartphone or tablet is connected to the same Wi-Fi network as your Insteon Wi-Fi Camera.
Confirm that your internet router and cable or DSL modem are connected to power and turned on. Learn how to Identify your router and cable or DSL modem.
Check that your Wi-Fi router is working by attempting to browse to a website using another device or computer in your home.
Try restarting your router and cable or DSL modem.
If none of the above steps resolved your issue, follow the steps outlined in this article to perform a factory reset.